

Ever since I've gotten my hands on Hitagi, I've dreamt of creating a setup just for her, instead of generally being lazy & heading outdoors the next day for photo taking. I've seen a multitude of inspiring backdrop fans built just for that single, winning shot, and it always looks so fun & rewarding.
Plus, I've long knew how I wanted her backdrop to look like, so I figure it's time to transform my imagination to reality and get DIY-ish~
As a very relieved graduate of the Landscape Architecture course, I've had with me a ridiculous bag of leftover materials from my modelling days, and what's a better time than now to use those money I've reluctantly handed over to the Art Friend cashier for something that really matters to me (never really enjoyed building models, since I would usually have hardly any time left to build it, let alone enjoy the process).
Seldom is there an anime that can create a character that leaves a long-lasting impression in a short span of 12 episodes, because there'll be people like me who would marathon it in a day and forgot about it (or most of it) the next. This industry is brutal that way.
It's been 3 years since I first watched Bakemonogatari, but a certain female character continues to linger in the back of my mind, despite it lasting only for 12 episodes. Sure enough, I have but forgotten what happened in the show and why I held Senjougahara on such high pedestal even till now. So, I went back to watch it, I even bought the DVD based on the good after taste in my memory. That just confirmed 2 things - I still love it and I love Hitagi even more than ever.
Hence the figure, hence the setup, and hence this post.
Okay where was I again? Man I just can't resist rambling here, I wanted to get those off my chest. So as usual, let me do a quick introduction of the figure. Let's do it this way so it's clearer to read in one goal:
Series: Nisemonogatari "Monogatari" Series
Manufacturer: Kotobukiya
Product Line: Causal outfit
Scale: 1/8
Material: PVC
Sculptor: M.I.C.
Release Date: Jan. 2014
Below is a tutorial of how I made the setup, hope you'll enjoy~
For those who have watched the anime, you would most likely recognise her trademark sadistic smile & the concept of the figure's design, which was taken from episode 1 of Nisemonogatari, the scene where this figure was based off from. I got really excited because I wanted to recreate that scene, so I went to google a reference snapshot for this project, which is also the first step:
1.

Above image stolen from the net, of poor Araragi under Hitagi's mercy
As the image shows, I would need to make tables, and quite a few of them. I've always sucked at figuring out scales and stuff, so once again I needed a second assistance - a scale reference book.

With the specs in front of me, it's time to convert them to 1:8, the scale our figure is modelled.
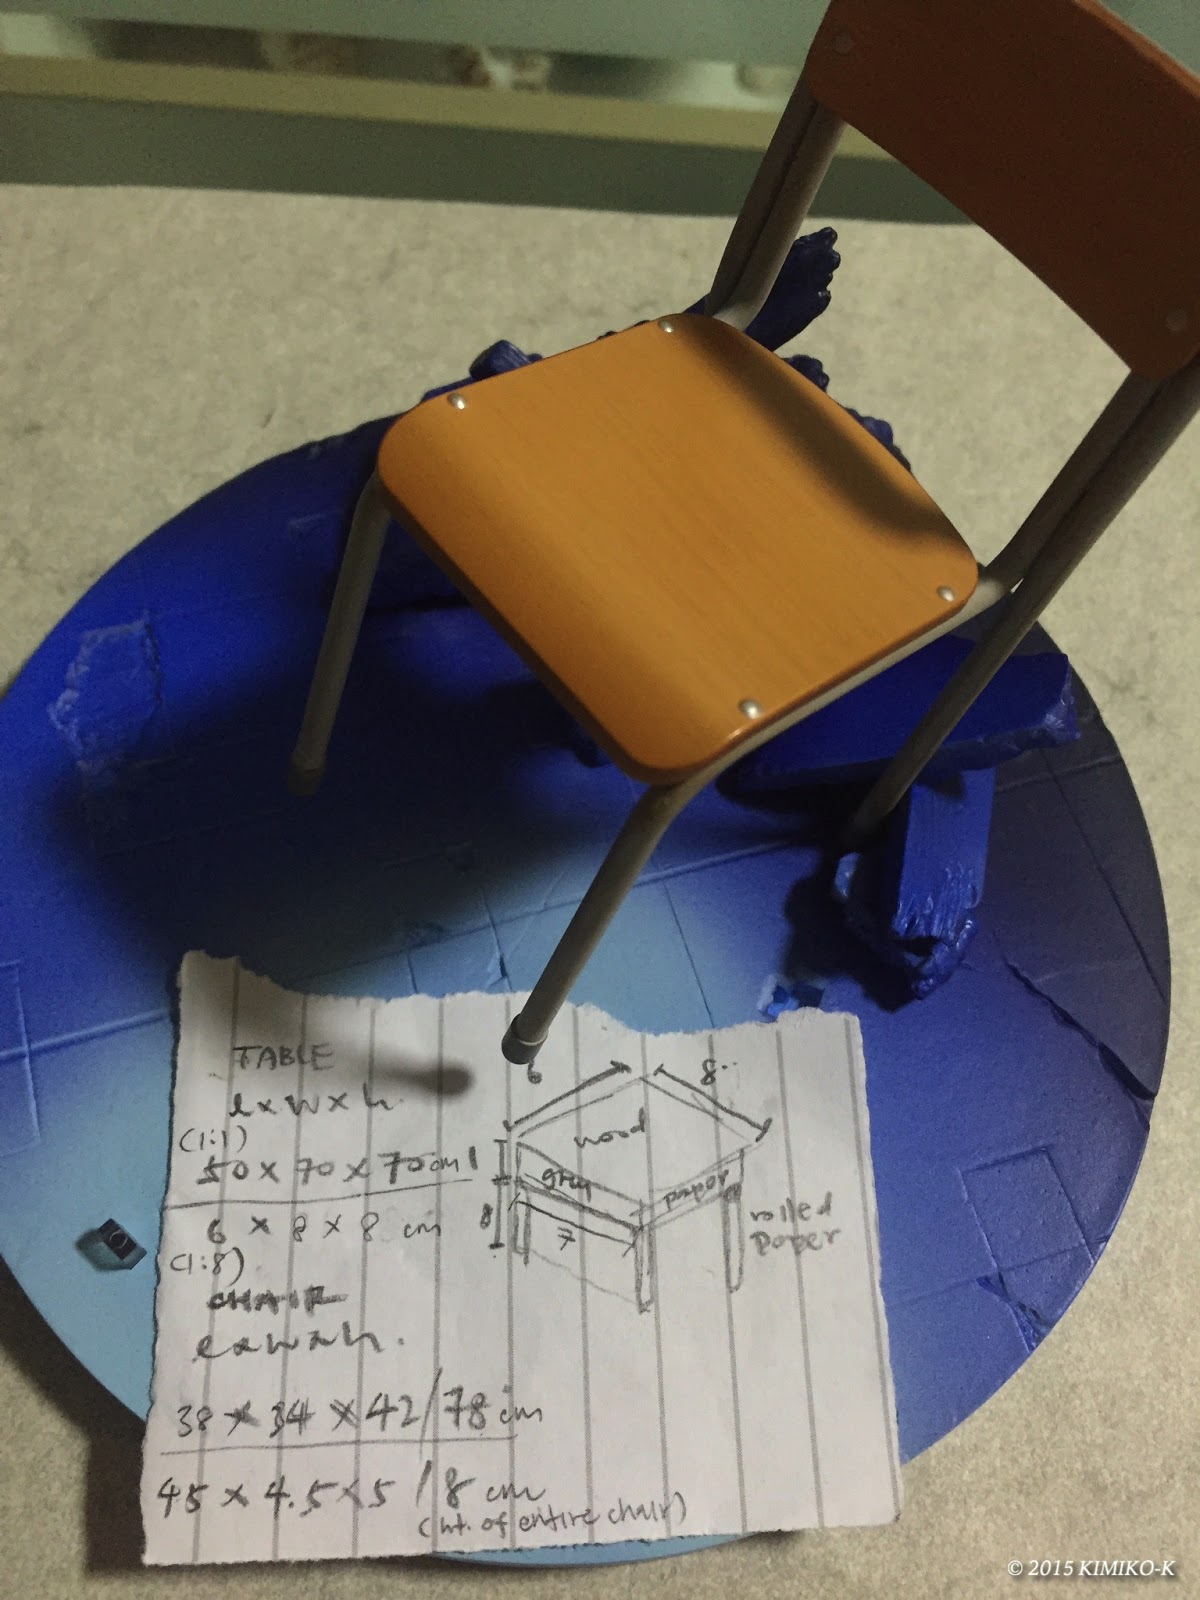

3. From left to right, top to bottom, I've cut out
- 6 x 8 cm rectangles from corrugated cardboard to represent the top desk
- Strips of fancy marble A4 paper measuring 8 x 1.75 cm for its legs
- 6.1 x 1.75 cm paper strips (same material) for support between the 2 hind legs
- 1 x 7 cm & 6 x 7 cm fancy grey A4 paper for the bottom desk

4. The left part is the completed bottom desk created from gluing three 1 x 7 cm of grey strips on top of the 6 x 7 cm grey rectangle. Next, glue the top desk (the cardboard) on top of the grey part, with the grooved surface facing down.

5. It will look something like the above image, kinda like houses @.@

6. Next are the legs! This is the most tedious step that can easily go wrong, as you're going to roll the strips, and it is bound to lead to inconsistent girths. I've found that applying the glue on one side before rolling will make life easier, but remember to keep the roll 'tight,' or your table's leg will end up looking fat & bulky. I also used the figure's chair as a guide to the diameter of the table leg.

7. After finish rolling, I used watercolour to paint a portion of one end to mimic the rubber stopper at the bottom of the table's leg.

8. The finished product! (Here tried liao, but what to do?)

9. To match the figure's base, I've went to scout for a wooden floor texture online and adjusted the colour as much as I could to its characteristic blue-purple hue, and printed 2 with varying brightness on A3 cartridge papers. The tree branch (drawn & cut out from A4 plain paper) was added as an afterthought to create a focal point & framing effect for the backdrop. I couldn't bear to ruin the blue background so I used a removable tape to stick the tree onto the surface.
10. According to the shading of the wall and floor, the light should could from the center and fades off around the corner (like vignette effect), so I had to do this in the dark, and stole my Mother's S3's torchlight (the only white light I have) to recreate that spotlight effect. To reduce the harshness of the light, I placed a tracing paper over the lens to diffuse the light.

DONE ( 终于)

Playing with the tables

Playing with the alternate hand that comes with the figure
The greatest disincentive to doing this is probably the way to deal with the setup after you're done. After investing so much time I really don't have the heart to just dump it all... In the meantime, I'll just leave it on my table till I need the space... ...
So what spurred me on despite this and my Mother's unhelpful nagging? I guess it comes down to how much you want to do it & what this means to you. To me, it is to reenact a context that suits the figure & bring out its potential, so that people can appreciate the figure in a different way.
Really, it's because it looks nicer.
Hope this proved helpful to those who wants to make tables. I really do suck at making models, I can't even get the legs to stick up 90 degrees... but it was fun, I had fun ^^
xoxo


0 comments:
Post a Comment