

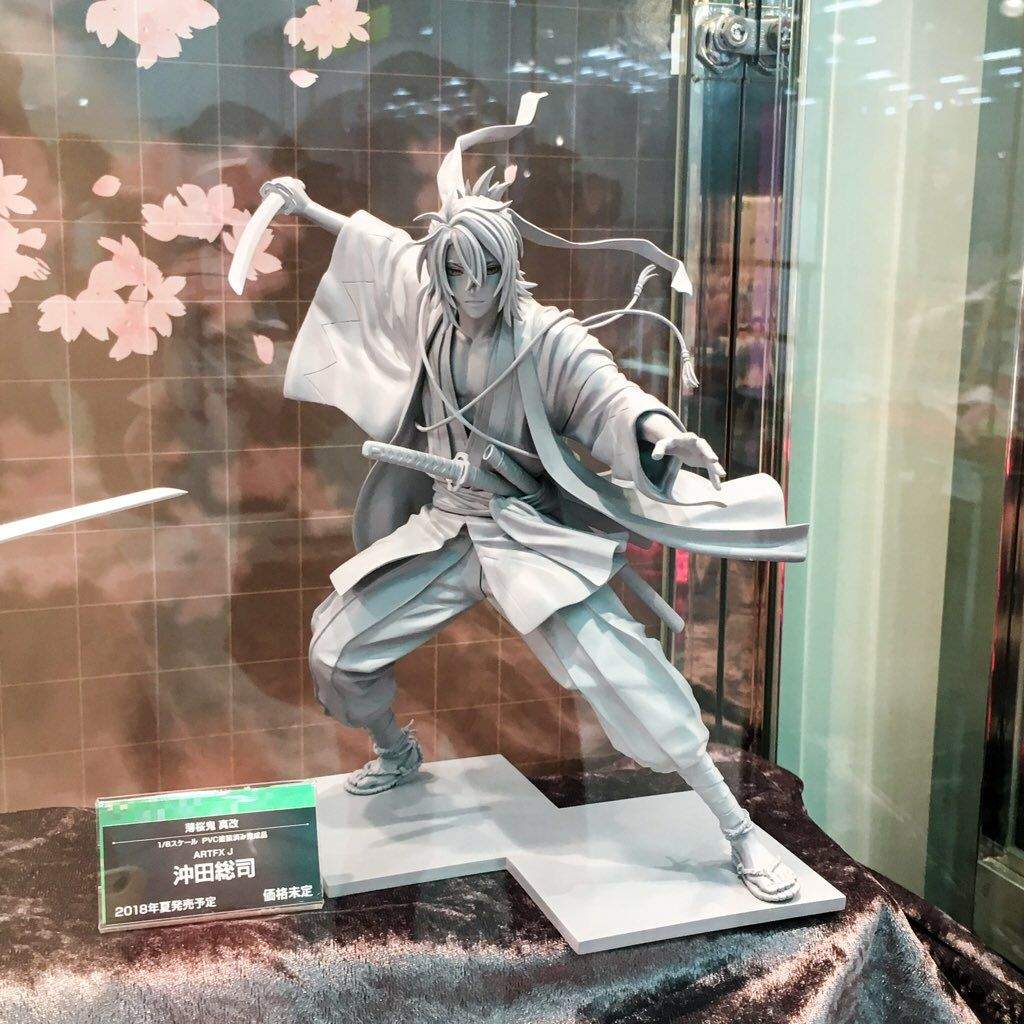
I couldn’t believe my luck when Kotobukiya, one of Japan’s giants of figure manufacturers, released the unpainted prototypes from a game-turned-anime series called Hakuoki (2012), 5 years after its release.
Source Aminews Twitter (2017)
In an industry where speediness and relevance makes money, this was a giant leap. Especially considering that the consumer group of the figure industry is predominantly male, coupled with the increasing amount of otome games (literally “girl games”) being churned out over the years, I could only speculate the pushing factor to be the popularity polls - a grade book equivalent for anime - to be the determinant. Oh bless the faithful fan girls!
Okita Souji was 1 of the 2 bad boys scheduled for the 1st (and evidently final) release, and as my 2nd favourite, I had to snag him.
As the sadist of Kyoto’s self-employed police force Shinsengumi, he is extremely popular among fan girls. Much credit is due to his seiyuu (voice actor) Morikubo Shoutaro, who also voiced Nara Shikamaru of Naruto. I wasn’t initially convinced but was eventually won over. The change of mind happened during this lovely scene:

Look how hard this basic MC who is supposed to represent all mediocre fan girls and hence “relatable,” is blushing... Oh but the sexy smirk oh Souji-
And that’s the beautiful part of otome games - no matter how basic and clumsy you are, he will eventually fall so hard for you he wouldn’t let you go...

We ladies could all do some under-the-tree cuddling, with the right man of course
This should suffice for the backstory, hehe. Let’s move on to the process.
*
*
*

My Kwansei Gakuin student buddy - why didn't I take any selfie too...
I actually forgot I've been to The Fushimi Inari Taisha at Kyoto until now... Unfortunately the shrine did not inspire fond memories as it was jam-packed with people and going to a tourist spot in the middle of Summer, not wise.
To keep things in context, I decided to import these iconic orange torii gates to Singapore. While this is one of the lowest costing projects, it was time-consuming and painful to build, versus the shoji panels from Hajime’s shoot.
I had to prepare both the vertical poles and overhead columns separately, as the top ones are rectangular. Boy do I hate rolling these cylinders... While I did not have to measure and prep 6 sides as I did for the rectangular overhead columns, the lack of QC meant every poles ended up with varying diameter. Thankfully it wasn’t evident in the blurred backgrounds (hah.)

To up it’s authenticity, I even summoned the dormant calligrapher within me and diligently copied the writings on the vertical poles, based on the photos I found on Pinterest.

And this stack of paper was the only purchase I made to make this happen.
You may not know this, but I enter every project with insecurities and uncertainties. Even with faithful research and careful planning of the backdrops, there are no guarantees.
Take this Fushimi Inari shrine theme project.
This was the second time the backdrop failed and the shoot was delayed by 2 weeks:
1. I did not make enough poles, leading to lack of intended depth;
2. Insufficient poles also meant I could not create the illusion of an endless pathway
3. (Painstakingly) gluing each poles to the floor led to jarring g a p s between them, ruining the authenticity

4. Steps (stairs) originally created for depth were abandoned - I made 3 of these steps/risers but that meant I could not create a bent pathway... in short wasted resources
5. There was a glaring empty backdrop at the end of the pathway
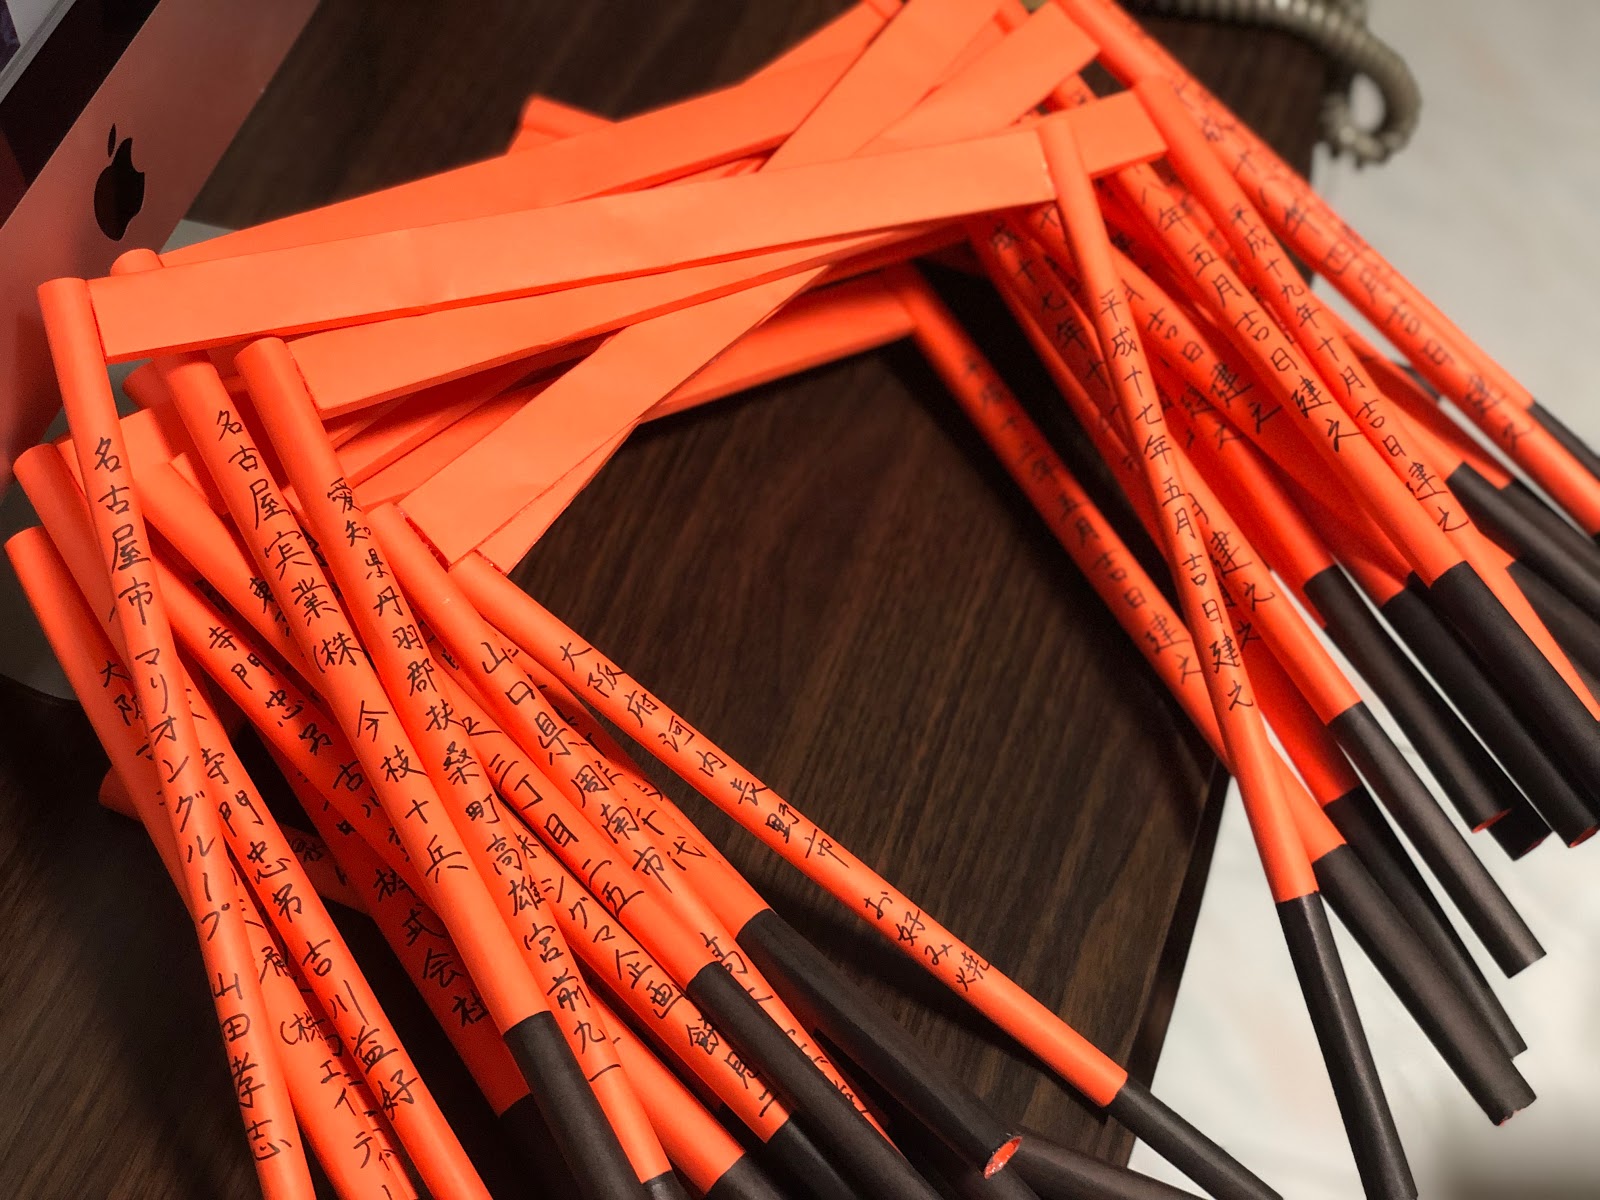
Fun fact - the inscriptions are names of the individual/organisation who donated to the shrine to get aa torii gate built for them. Price starts at ¥400,000/gate.
I nearly gave up but that entails wasting my time doing these 22 poles AND no post, so I persisted...
Wholly glad I did, so now I can share with you my March-April feature model - Okita Souji.
*
*
*

See what I meant by the empty backdrop? Thank goodness I managed to find a stand-in shrine to fill that space-

Experimenting with contrast and shadows

I really enjoy this night shot

Original photo - I really enjoy taking photos with this low contrast and light setting on my camera

After editing - I took an hour to figure this out

Behind The Scene - to counter the stupid gaps and save time, I pushed the poles together such that they're leaning against one another
And that's it, thank you lovelies~
And I'm running out of figures to photograh-
xoxo


